To create a new thread, select the New Thread option on the File menu of the main display (or take advantage of the hot key, ^N). To edit an existing thread, use the mouse to double click over the thread of interest. In either case, the Edit Thread panel will appear on the display (as shown above), overlapping the main threads window.
Note that while a thread is being created or edited, the main window of the threads program becomes inactive. You can only manipulate one thread at a time. Also, while editing an existing thread, all other users will be locked from accessing that thread until the edit session is complete
The Edit Threads window lists every file within the defined Razor group, much as the versions program would. The information displayed however is slightly different. Not counting the glyphs which appear next to the file names, there are four columns on the display.

The first column will contain a "+" if the file is included as part of the thread definition. If it is not to be included in the thread, then this column will be blank, as is the case for the file "Notes" above. For files that are part of the thread, the 3rd and 4th columns show the latest version of the file, and which version is actually included in the thread. Refer to "Filtering the display" on page 147, on how to limit the main display list.
There are several means of editing a thread definition, as detailed in the following sections.
It is possible to absorb an existing thread definition as the starting point for creating a new thread, or as a means of picking up where another thread left off. Selecting the Import option from the (Edit Threads) File menu will bring up the following panel.
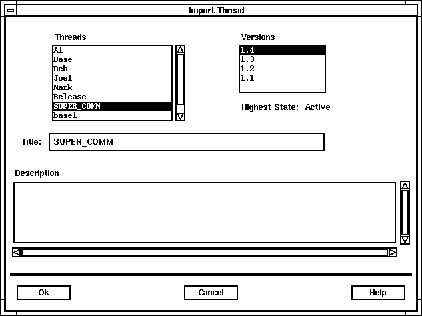
A list of all the existing threads for the group appears in the upper left corner of the panel. As selections are made from that list, the upper right window will update to show all of the possible versions of that thread. As the selected thread/version changes, the Title and Description fields will update accordingly. After choosing a thread/version combination, selecting the Ok button will update the current thread to the same definition.
Importing a version of a thread does not completely overwrite the version being edited. For example, let's say a file was not included in version 1.5 of a thread but was included in 1.6. Further more, someone edits 1.6 and then imports 1.5, the thread (which will now be saved as 1.7) will include the file that was excluded in 1.5. That being said, the best way to think of importing a thread is that it works as a mask rather than an overwrite.
As files are highlighted on the Edit Threads display list, a small popup will appear. It allows the user to decide on a file by file basis whether it should be included in the present thread definition.
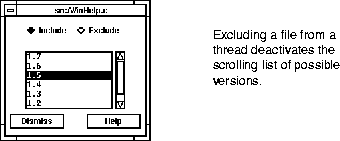
If the indicated file is excluded from the thread, then the scrolling list is inoperative. Otherwise, it shows all of the possible versions of the file that can be referenced. Modifications to this popup panel have immediate effect on the definition of the thread and are reflected on the main list itself. This option provides the user with the highest granularity control over what file/version combinations belong in the thread.
Of perhaps greater utility than the file by file process described above, is the ability to make broad, sweeping decisions as to what file/version combinations should be included as part of a thread definition.
The simplest case is where we want to define a thread that includes all known files at their most recent version. Choosing the Blanket Selections option from the (Edit Threads) Selections menu (or using the ^B hot key) will bring up the following panel.
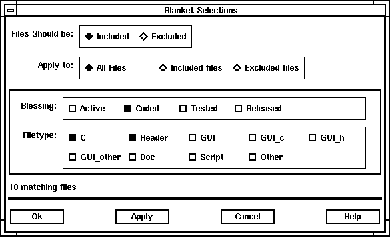
To select the latest versions of all files, we'd set the top selector to Included, and apply the decision to All Files. We would not restrict the action to any particular filetype or Blessing. All that would be necessary to enact the choice is to select the Ok button at the bottom.
Let's build upon the concept of making broad file/version selections for a thread. Blanket Selections has some powerful capabilities to enhance file selection.
The interface is divided into three key areas. Working up from the bottom, we have...
A few examples may clarify how this interface can best be used.
Increasingly complex illustrations can be made. The point is that through a little forethought and a combination of the preceding functions, it is possible to quickly pull together any thread definition you choose.
If you've been diligent enough to stay with our documentation to this depth, then we'll reward you with what is perhaps the greatest gem in the Razor crown. You can define which versions of which files go into a thread by whether or not they were affected as a result of working on one or more issues.
This is important, and bears repeating... You can define which versions of which files go into a thread by whether or not they were affected as a result of working on one or more issues.
From the (Edit Threads) Selections menu, choosing the Include based on issues option will bring up the following panel.
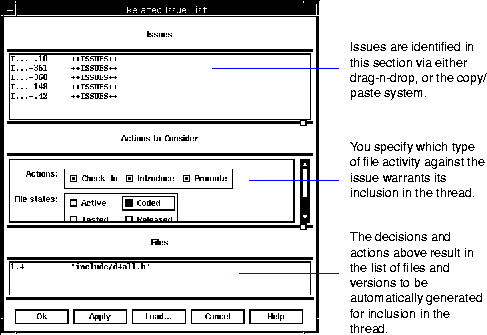
The panel basically feeds the user from the top down.
The drag-n-drop method is typically used for selecting a small number of issues, so we support an alternative method. The Load button on the bottom of the panel lets you refer to an external file which specifies a full list of all issues to be included. This file has the form <issue#>![]() <issues group>, one per line.
<issues group>, one per line.
No, this is not a misplaced section from a tree surgeon's manual. Trunks and branches are terms Razor uses to describe the state of divergent modification paths a file can take. A trunk version of a file is one that does not have branches (sounds simple enough). A branched version of a file is one that has a separate modification path, based at one point on a trunk version. Trunk version numbers have two numbers, e.g. 1.22; branch version numbers have four numbers, e.g. 1.22.2.3, where the first two numbers of a branched version number are the trunk version it was branched from. "Parallel development" on page 94 has a discussion of trunk and branch versions.
By default, Razor will only allow one version of a file (trunk or branch) to be included in a thread.4 This behavior is set via the Selections pulldown of the Edit Thread dialog. The choices for selection are "Allow selection of one trunk OR branch" (the default) and "Allow selection of any trunk AND branch".
With some of the methods5 available for editing a thread, it is possible for multiple versions of a file (including trunk and branches) to be "eligible" for inclusion. Based on the default selection, Razor will choose the highest selected version of the file for inclusion in the thread. If the version selected is not the desired version, the user may select the appropriate version of the trunk/branch via manual selection.6
For example, let's edit the thread `thread_test', choosing "Include based on issues"7. The issues to be included have been associated to changes made to a trunk file and two versions of its branches as follows:
I...-502        apple           1.5
I...-499        apple@1.4.1     1.4.1.6
I...-505        apple@1.2.1     1.2.1.2
Razor would select version 1.5 of the file `apple' for inclusion in the thread "thread_test" as shown below:
+       apple           1.5             1.5
        apple@1.2.1     1.2.1.2         --.--
        apple@1.4.1     1.4.1.6         --.--
        apple@1.6.1     1.6.1.2         --.--
This default behavior may be modified by selecting "Allow selections of any trunk AND branch" via the Selections pulldown of the Edit Thread dialog. The default behavior of these selections as well as making one of these selections insensitive can be handled via an X resource, refer to "X Resources" chapter on page 273.
After all of the necessary edits are completed, the new definition must be saved back to the Razor database. If this was an existing thread that has been modified, then selecting Save from the (Edit Threads) File menu will bring up the following panel.
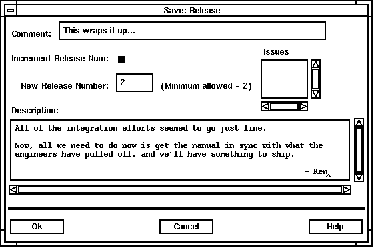
As when checking a file back in from being edited, the user is required to enter a title line. A longer description of the change can be entered, as well as associating the action to one or more issues from the problem tracking system.8
When the thread definition is saved back into the database, its minor version number will automatically be incremented (i.e. if it was at 1.5, it is saved as 1.6). By setting the Increment Release toggle on the panel, the user can force the major release number of the thread to go to whatever is entered as the new release number indicated.
Finally, selecting the Ok button on the panel will cause the new thread definition to be stored back into the database.
If this is a new thread, the only possibility from the (Edit Threads) File menu is to Save As a new thread name, and the following panel will appear.
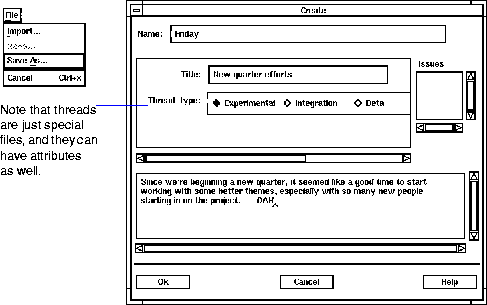
A thread name must be provided, as well as a Title for the effort. And, as above, a longer text description may be provided and the action can be associated with one or more issues from the problem tracking system.
Since this effort is in effect similar to introducing a new file into the versions program, you will also have the opportunity to provide the initial settings for the attributes associated with the thread. In the example above, the Thread_type is being set to Experimental.9
Selecting the Ok button at the bottom of the display will cause the new thread to be entered into the database at version 1.1.
|
(Part 5 of 11 for this section) (Generated 09/13/99 at 17:57:04) |
|||
|
Copyright Tower Concepts http://www.tower.com Voice: 315-363-8000 Fax: 315-363-7488 support@tower.com sales@tower.com |