The first step in letting Razor help manage your version control needs is to introduce files into the database. To do so, make sure that you've set the program to the proper Razor group. If you wish to introduce files into an existing folder, you must select the destination in the files/folder list. Then, with the destination selected, select the Introduce button from the main display. The following panel will appear.
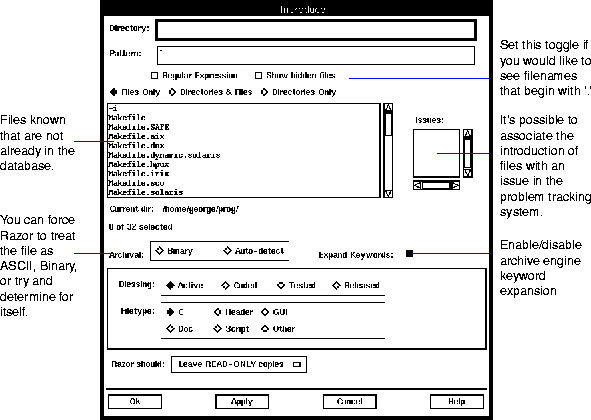
Through this interface, you'll be able to guide the versions program around your directory system, identifying the files of interest, and inserting them into the database.
There are two ways of using the panel to navigate around your system, and it is up to personal preference as to which is easier. The first is to type in the desired directory into the top text field. The use of tilde ("~") and environment variables is allowed. Upon pressing the carriage return, the scrolling list will update to show the contents of the directory.
As an alternative, users may also `walk' around the directory system. By toggling what is displayed in the scrolling list, it is possible to display directory names in amongst the files. Double-clicking the mouse over a directory will cause the panel to enter it and update the contents of the list accordingly. Either way, the current directory is always displayed just below the scrolling list itself.
It is also possible to enter a filename pattern to restrict the files that are displayed in the list. The pattern text can be specified as either a UNIX style wildcard or as a regular expression, based on how the toggle on the panel is set.
TIP: it's possible to have the versions tool always start up at a specific directory, which eases or eliminates the need to drive the tool around in search of files. To learn more, see "Setting personal preferences" on page 119.
To introduce files into the system, highlight the files you are interested in from the scrolling list. You can select as many files as you wish1. Then, set the attributes for the files from the options provided.2 (Remember, the meaning and nature of the attributes are completely up to your local configuration, and may not resemble the collection shown here.)
The Expand Keywords option allows control over archive engine keyword expansion during check-out. By default, keyword expansion is enabled, but you might have a reason not to if you have characters that look like keywords.
If you had a folder selected on the main display of the versions program, then whatever files you select on the introduce panel will end up being placed into the indicated folder. If no folders were selected on the main display, then the files will be introduced at the top of the group. If you select a directory on the introduce panel, then it will automatically create a folder of the same name, and recursively introduce everything within it.3
TIP: If you can't find your file in a folder after you introduced it, check the top-level group. You might have forgotten to select a folder before you introduced the file.
Finally, decide how you'd like Razor to process the files by choosing one of the three possible actions shown here.
![]()
Take the files tells Razor to check the files back into the database and remove the working copy from the originating directory. Leave READ-ONLY copies will check the files in and leave a read-only copy in the working directory. CHECK-OUT the files checks the files into the database and immediately checks them back out again for edit. This last operation is commonly referred to as a checkpoint.
Once everything is set, selecting the Apply button will begin the procedure. A small popup will appear giving a running tally of how it's going. Once the selected files have been introduced, their names will appear on the main display list. Files already introduced will no longer be shown in the scrolling window of the Introduce panel. This prevents you from accidentally entering two files with the same name into the same Razor group.
The Introduce panel will stay on screen after the maneuver, allowing you to introduce more and more files into the system. Selecting Cancel will remove the panel from the display (but will not undo the introductions just made).
Razor permits the rename of files that are under version control. The same interface may be used to both rename a file and move a file to a different location within the same Razor group. A move is simply renaming a file to a different location. Highlight the file in the versions list and select the Rename option from the File menu (or type ^r). This brings up the following dialog.
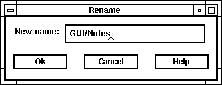
It will come up showing the current name and folder. Simply type in the new name and folder you want it to have and select the Ok button. Note that any existing threads which refer to the old name will still work properly.
By default, Razor will try to use either SCCS or RCS as the underlying archival engine for the file version control scheme. These systems work just fine in many situations, but some file formats require special handling. These are often non-ASCII files, and can be of any type; tar files, CAD files, documents from a word processor, etc.
To accommodate this, if a file is identified as being binary at the time of introduction, then Razor will utilize its own scheme. In brief, the file will be compressed, renamed, and stored in the Razor database. These steps will be transparent to the user.
The decision of whether or not a file is to be treated as ASCII or Binary must be made at the time of introducing the file. If you toggle the Archival setting to Binary, it will force the program to treat it as such. If you've chosen Auto-detect, then the versions program will try to decide for itself. If neither of these is selected, then the file is assumed to be ASCII, and it will be treated as such.4
As mentioned earlier, the versions program will use either SCCS or RCS as the archival engine for its operations. As such, it is possible to allow Razor to pick up where your present SCCS/RCS investment leaves off.
There are two shell scripts provided with the Razor release which facilitate this effort. They are found in the directory $RAZOR_HOME/scripts, and are named rz_inject (for handling SCCS investments) and rz_inject_rcs (for RCS investments). A liberal amount of commentary is provided within the scripts regarding usage, and you are encouraged to refer directly to them for specific details. Below, however, is an overview of the steps involved.
NOTE: To best ensure the history is retained for an existing archive of a non-ASCII file, do not choose an archival type on the Introduce dialog.
NOTE: The above steps MUST be done by the local administrator of the Razor database rather than a generic user. Also note that no harm will come to the existing SCCS/RCS files.
Attributes can be set at introduction time from an introduce.apply before script. See $RAZOR_HOME/examples/intro.before5 for a sample of how to use this technique to set the Filetype and Binary attributes based on file extension.
Outputting a tab separated list of Attribute/Value pairs to the file $RAZOR_ATTR_FILE (set by the versions tool) allows scripts to override selections made by users (except STATES, aka Blessings). Creating the file $RAZOR_TMP/RAZOR_BINARY.$RAZOR_PID will cause the file to be introduced as a BINARY file. Razor will remove this temporary file for the user.
|
(Part 5 of 17 for this section) (Generated 09/13/99 at 17:45:49) |
|||
|
Copyright Tower Concepts http://www.tower.com Voice: 315-363-8000 Fax: 315-363-7488 support@tower.com sales@tower.com |