As its initial default, the issues program will display all entries known to the system in numerical order. Over time, this can grow to be a very large and unwieldy collection. Razor provides you with a variety of options for controlling and organizing what is presented to you.
Depending on how Razor has been configured for your system, you may have a number of glyphs (pictures) associated with various attributes on the issue form. This is offered as a configuration option specific to all issues within a database, and can not be customized on a user by user basis.
Often the glyphs are associated with information such as the priority, state, or level of effort noted on the issue form. For information on how to configure this capability, see "Associating glyphs to attributes" on page 209.
As shown earlier, the main display of issues normally contains lines showing only the issue number, a line of descriptive text, and possibly some glyphs. It is occasionally useful to also show information relative to when the issue was last modified.
By enabling the Days since Last mod option (^l) from the View menu, the display will widen and add a note of the number of days since the issue was last modified. Similarly, you can choose the Modification date (^m) option from the View menu and the main display will now include the exact date of the last modification of the issues.
Both of the above toggles can also be accessed from toolbar buttons.
As with the UNIX command ls, dates occurring more than 6 months ago are shown as the date and year of the modification. Dates less than 6 months ago will display the date and time of day that the edit occurred.1
As the list of issues grows, it may be necessary to limit it to just those that are of particular interest or have something in common. Filtering the issues list provides a finer level of control of the issues display.
By choosing Filter & Sort from the View menu (or using the filter and sort toolbar option), a popup similar to the one shown below will appear. You are free to move and resize it as necessary on your display.
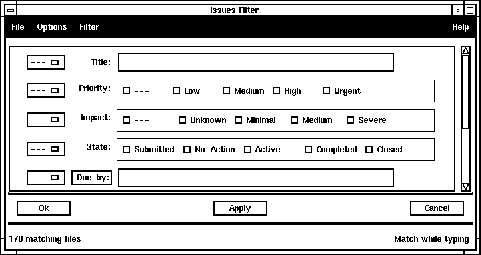
Three menus provide control over various aspects of the filter operation.
These options are described in more detail in this chapter.
You'll note that the widgets on the Filter & Sort display are closely mapped to the widgets that appear on the top of an issue form. These are used to define which issues on the main collection are of interest to you.
All of the attributes on the issue form which provide a choice of options are presented on the Filter & Sort panel as an X_OF_MANY selector. As you toggle the options on the Filter panel, you are indicating your interest or disinterest in issues which match your selections.
For example, if you were interested only in issues that were assigned a High priority, you would select only the High option on the Filter panel.
![]()
If you wanted to see every issue except the High priority ones, you would select the Medium and Low boxes, but not the High.
![]()
Within a particular filter widget, an issue is considered a match if any of the selections hold true.
It is possible to filter the issue collection by matching particular text strings. Character sequences entered into one of the text widgets on the Filter Panel form UNIX regular expressions which are compared against each issue in the system. In their simplest forms, a regular expression just searches for a string which contains what you have entered, and this is often sufficient.2
As a convenience, the Options menu contains a checkbox which indicates whether or not you want the text searches to be case sensitive. If it is not selected, then case is considered. If it is selected, then the case is ignored.
As you enter the search string into the text field of the filter panel, the issues program does a pass through the database for each character as you type. The left footer of the filter panel displays a count of how many matching entries are found. If you prefer to not incur the slight performance hit this approach presents, then you can turn off the match while typing feature from the Options menu. When disabled, the footer display is only updated when the keyboard focus moves someplace else.
On an issue form, a checkbox is either checked or it is not. Simple. On the filter panel, you must indicate whether or not you are concerned with the setting of the related checkbox, as well as which setting you want a match on.
![]()
For checkboxes, if the setting of the checkbox is not important for your filter, then have the Ignore box selected. If Ignore is not set, then an issue is considered a match if the related attribute on the form matches what you have on the filter panel.
A powerful mechanism for filtering what is to be shown on the primary display is by time stamp.3 If you have a TIME_STAMP attribute on the issue form, then there will be a corresponding opportunity on your filter panel. It presents itself as a text field with a button beside it instead of a label.
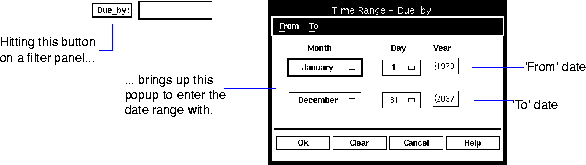
The text field itself is not directly editable. By selecting the related button however, a new popup will appear which provides a more programmatic and controlled mechanism for entering the desired date range.4
As with entering timestamp information on the form itself, you use the pull down selectors to enter the desired month and day, and type in the year. To make entry of certain fields easier, you can also take advantage of the From and To menu entries which allow the setting of either field to specific relative dates (yesterday, a week from now, etc.). Please note that the top field represents the beginning of the desired date range and the lower field represents the ending of the date range.
When you have made settings in more than one of the widgets on the Filter panel, you are creating a more sophisticated match criteria. The effect is that a particular issue will end up on the main list only when it matches each of the tests you have set up. For example:

In the filter above, an Issue will match only if...
... it is in either the Active or Completed states, and
... the Due_by date is set to anytime in March, 1998, and
... the Okay checkbox has been set.
If no sort specifications are indicated, then all of the issues which pass the filter criteria will be arranged purely by the issue number (which is also indicative of the order in which they were entered into the system). By setting the sort criteria however, you can adjust the natural presentation order more to your liking.
On the filter panel, to the left of widgets that can be sorted, is a menu button, as shown below.
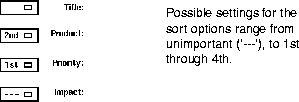
By identifying an attribute as "1st", that will be the primary key used for ordering the issues on the main display. In the case of tied values, the sort criteria resorts to the 2nd, and then the 3rd and 4th in order (if defined).
Using this capability, you could arrange to have your main display ordered first by Priority, and secondly by Product (or the inverse). This, in combination with effective filtering, provides for quick and powerful insight into the collection of issues.
In the case of tied sorts (as defined above), the main display will naturally resort to ordering the issues by the issue number, which is indicative of the order in which they were introduced to the database. Occasionally, it is useful to have the issues sorted by the last time modified. This gives insight as to where the most recent or most distant activity has occurred.
To activate sorting by modification date, select the Sort by modification date option from the Options menu of the filter panel. This setting will also be noted in the footer of the filter panel itself as a reminder. Note that the setting of this toggle will not take effect until the user next selects the Apply button on the filter panel.
Finally, the issues program naturally sorts the entries from lowest to highest value. You can invert this tendency by choosing Invert sort order option from the Options menu. This setting is also noted in the right footer of the filter panel as a reminder.
Note that the setting of this toggle will not take effect until the user next selects the Apply button on the filter panel.
Since the issues program allows you so much flexibility and control over the filtering and sorting of the main list, it also makes sense that users should be able to save their favorite settings.5
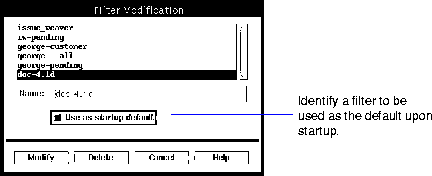
To facilitate this, there are a collection of options under the File menu of the filter panel. Most of these are self-explanatory, and do not warrant a detailed description. The key point is that you can create/modify/save/delete filters and associate names to them. To designate one as the default filter applied when issues is started, use the Modify/Delete Filters option, select the desired startup filter and select the Use as startup default option. As shown, the startup filter is defined as "doc-4.1d".
The power to filter and sort the list of issues as described above is restricted to utilize only the information contained in the collection of attributes at the top of the issues form. As such, they are very fast and efficient. Occasionally however, you may want to search for text strings within the body of either of the two free format text sections.
Selecting Text Match from either the View menu or from the toolbar, will bring up the Text Match popup. Below is an example of a text match searching the Solutions text pane for issues that programmer MTD has updated.
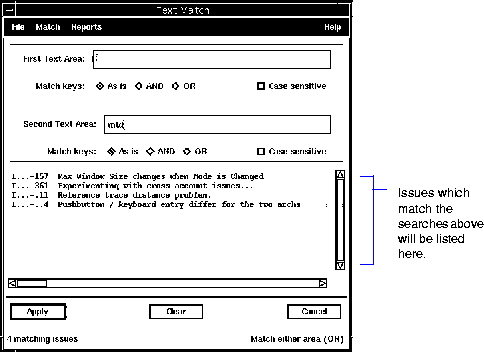
The Text Match popup has File, Match, and Reports menus.
To perform a search for matching text strings, you would enter UNIX style regular expressions6 into either or both of the text lines at the top of the form. Selecting the Apply button will cause the issues program to begin a scan through the pre-filtered collection of issues.
The first key is compared in the first of the two text fields on an issue form; the second key is compared in the second text field. Either of these may be left blank by the user. Whether or not a `hit' in both or either of the text fields is required is controllable by the user through the Match menu at the top of the panel. The right footer of the display shows a reminder as to what the prevailing logic is. In the example shown, if a text match is found for either the top OR bottom panes, then it is considered a successful hit.
Since entering a case insensitive regular expression is often tedious, you can have the issues program do it for you by toggling the state of the checkbox just below where the keys are entered.
Once a search has completed, the scrolling list on this panel will contain a static subset of the issues on the main display. You may double click on lines in this subset to bring up a copy of the issue, just as you would off the main display.
Please note that this subset list shows the results of a single pass through the issue collection. Whereas the main issues scrolling list is dynamically updated to reflect changes that other users may be making in the database, this subset list is not.
|
(Part 6 of 8 for this section) (Generated 09/13/99 at 17:39:24) |
|||
|
Copyright Tower Concepts http://www.tower.com Voice: 315-363-8000 Fax: 315-363-7488 support@tower.com sales@tower.com |