Razor provides an out-of-the-box, basic, Attributes file. This Attributes file is intended to be a starting point for your customization efforts. Even after you've customized your Attributes files and have functioning databases, your needs may change for the values or names of attributes currently in use. ALL changes to the Attributes file should be left to the responsibility of your Razor Administrator.
It's possible to configure Razor to directly disallow changes to specific attributes, based on the setting of other attributes (ONE_OF_MANY style) on the issue form. Better still, this conditional insensitivity can be made to specific users or roles1. The file which controls all of this is...
$RAZOR_UNIVERSE_DIR/DOMAIN_01/<issue group>/Tables/
Insensitive
This file defines which fields should be made insensitive (grayed out) when the attribute/value/who fields match. Within the file, fields are TAB separated and are defined as:
<attribute><value>
The <who> field can be any combination of users, user groups and roles. User group entries (under UNIX or WindowsNT) must be preceded by a '+' and role names by a '%'. To match users who are not a member of an entry, precede the entry with the not symbol '!'.
When the field 'Level' is set to 'Active' we want the 'Priority' field to be inactive for all users:
Level
Impact
When the 'Approved' toggle button is set, make 'Responsibility' inactive for users barney, wilma and members of the 'jetson' group:
Approved
When the 'Priority' field is set to 'High', make 'Impact' inactive for all users not in the CM role:
Priority
As noted earlier, a STATE attribute is a special purpose ONE_OF_MANY. Within the context of the issues program, it is used to represent the process flow or lifecycle of an issue. Issue STATEs allow you to...
For the sake of discussion, let's examine the simple 5 state model diagramed below. Although the relative merits and shortcomings of this example could be hotly debated, it will serve well for the purpose of illustration.
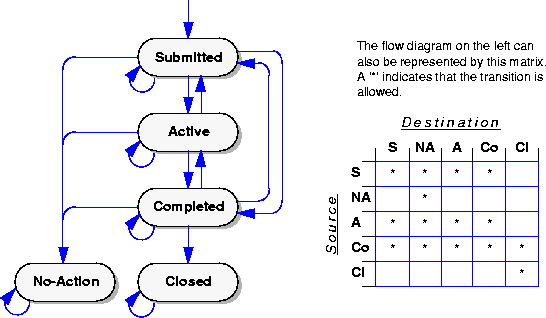
The arrows on the diagram indicate the acceptable and anticipated transitions in the status of an issue. All new issues enter the system in the Submitted state and (hopefully) end up in either the Closed or No-Action states. In this example, some amount of cycling between the Submitted, Active, and Completed states is allowed but once an issue reaches either of the terminal states, no more modifications are possible. As you can see on the chart, a Closed to Closed transition is allowed, meaning that modification of the issue contents are allowed, but it cannot return to a prior state.
To define the names and basic order of the states, you would need a single line in the file $RAZOR_UNIVERSE_DIR/DOMAIN_01/<issue group>/Tables/Attributes, such as the one below...
STATE
The next step is to define the various state transitions in the Permissions file, which is found in the same directory. With a text editor, you must spell out all the possible transitions. With a 5 state model, there are 25 different paths which must be clearly spelled out. (Even when a person makes a simple edit to an issue without directly changing its state, it is treated by Razor as if a state change occurred, with the transition path going to and from the present state.)
Each line in the file is used to denote which userid's2 are allowed to make the indicated transition. There are three required fields on each line, with tabs serving as the field separators. The first two fields indicate the initial and destination states respectively, spelled and capitalized exactly as they appear in the Attributes file.
The third field indicates who is allowed to bring the issue through that particular change. An asterisk is used to allow all userids equal ability to perform a particular state transition. If a particular path is not to be allowed, then the keyword "nobody" should be used. When only a specific set of known userids are allowed, then they should form a comma separated list. You can also take advantage of user groups and defined roles.
TIP: A handy script is available in $RAZOR_HOME/examples called build_default_permissions. It creates a new Permissions file (in the database) based on the current STATE settings.
Submitted
It should be noted that the above definitions are basically a line by line description of what is shown in the matrix on page 206. Also notice that in this example, if a particular state transition is allowed, then all users on the system have been granted the permission equally. To change this, you need only change the third field on the affected line.
For example, if you wanted only Norm, Cliff, or the Admin group to be capable of bringing an issue to the Closed state (or of editing it after it was in the Closed state), then you would modify the related lines to read...
Completed
The issues program automatically records and displays the user id and timestamp of state transitions. Users can supplement the time stamp and user id which appears on an issue form STATE transition by creating a script named:
$RAZOR_UNIVERSE_DIR/DOMAIN_01/<group>/Scripts/rz_state_string
When invoked, the script receives the following parameters:
$1 = Date string
$2 = User id
The first line of output from this script will be appended to the standard state information. This may be handy for including the phone number of the individual directly onto the issue form itself.
It is often the case that you would want certain individuals automatically notified when particular issue state transitions occur. The Permissions file supports an optional 4th field on each line which is a comma separated list of users to notify of the state change. Entries in this list can be any combination of e-mail addresses, Razor roles3 (prefixed by %), and attribute fields (prefixed by $RAZOR_ATTR_name) that consist of e-mail addresses and/or roles.
Expanding on our example above, if you wanted Carla and the Admin role to be notified whenever an issue went directly from the Submitted to the Completed state (skipping over the Active state), then you would modify that particular transition line in the Permissions file to read...
Submitted
The e-mail message which will be sent is a full text representation of all information contained in the resultant issue form.
NOTE: It is possible to e-mail information directly to a program or script. This would allow you to have some state changes send information to a script which makes programmatic decisions on who should be notified rather than always sending the information to the same users. For more information, see "Scripts which receive and process e-mail" on page 247.
As noted earlier in the manual, it is possible to associate glyphs to the settings of an issue's STATE or the various ONE_OF_MANY style attributes on an issues form. These glyphs would appear on the left side of the main scrolling display of issues, providing quick visual insight to the nature of the issue.
To define the glyph usage, you need to edit the file $RAZOR_UNIVERSE_DIR/DOMAIN_01/<issue group>/Tables/Bitmaps directory. Each line defines a relationship between an attribute value and a glyph. Three tab separated fields are required, as shown below:
<label>
For example, if your Attributes provided for noting the relative priority of an issue as follows...
ONE_OF_MANY
Then you could have glyphs showing from 1-4 dots, depending on the relative priority the issue had been assigned. The corresponding lines in the Bitmaps file would read...
Priority
If a specific attribute setting is not directly called out in the file, then no glyph will be assigned to that setting and the space will be left blank (as for the `---' setting in our example).
Typically, the first of the two text panes is used to record a statement of the problem at hand. The second pane is often used as an engineering notebook; a place for recording notes and comments as the task is addressed and brought to resolution. You are not bound in any way by these conventions, however, and are free to use the two text panes in whatever manner you see fit.
It is possible to pre-load the two text panes at the bottom of the issue form when new issues are created. Through this approach, your intended utilization of the text panes is self-documenting. These panes may contain essay questions, delimiters, instructions, or whatever else you deem necessary.
The text to be pre-loaded should be included in the files Problem_template (text pane 1) and Solution_template (text pane 2) which are located in the <issue group>/Tables subdirectory.
Sometimes it might be nice to "tighten up" the issues form beyond what Razor produces by default. For example, you might want to place two attributes on the same line of your issues form. There is a very useful script in $RAZOR_HOME/examples called attr_to_xy. To run it, enter...
attr_to_xy [-g <issue group>] [<outfile>]
It will generate X/Y positioning for attributes in the input issues group. If <outfile> is specified, output will go to this file, otherwise, stdout will receive the output. Once the X/Y positions are generated, they can be tweaked as necessary. Remember to incorporate the X/Y positions into your Xdefaults or Wdefaults files4. You must rerun the Razor program for these changes to take effective.
Below is an example of how to run this script, with its output going to stdout:
# $RAZOR_HOME/examples/attr_to_xy Starting X position [10]:Starting Y position [10]:
Place these and other Xdefault commands in the file $RAZOR_UNIVERSE_DIR/Xdefaults to control X settings globally.
Colors may be used to convey certain themes or messages to your users. Colors of both attribute labels and values can be controlled through X defaults. Let's say you had a ONE_OF_MANY attribute named Priority with values: ---, Low, Medium, High, Urgent. The following X defaults will set the foreground color of the label to Brown and the attribute value foreground color depending upon the value:
Issues*PriorityLabel*foreground: Brown
Issues*Priority*---*foreground: Orange
Issues*Priority*Low*foreground: Red
Issues*Priority*Medium*foreground: Blue
Issues*Priority*High*foreground: Green
Issues*Priority*Urgent*foreground: Orange
See "X Resources" on page 273. for a detailed description of the X resources available for customization.
If you're starting fresh, we'd encourage you to begin with a minimalistic approach. Design your issues form with as few attributes as necessary to accomplish what you truly need. This is often achieved through some simple modifications to the default arrangement supplied as part of the Razor release. As time progresses and your experience with the environment grows, add other attributes and conventions as needs dictate.5
Similarly, don't start off with lots of attached actions to enforce rules. This is for two reasons. The first is that by waiting a little, you may avoid the need to change and edit scripts to accommodate changes in the way the attributes are laid out. The second is that you may discover that a programmatic policing of people's actions may not be necessary after all.
|
(Part 6 of 9 for this section) (Generated 09/13/99 at 18:03:21) |
|||
|
Copyright Tower Concepts http://www.tower.com Voice: 315-363-8000 Fax: 315-363-7488 support@tower.com sales@tower.com |